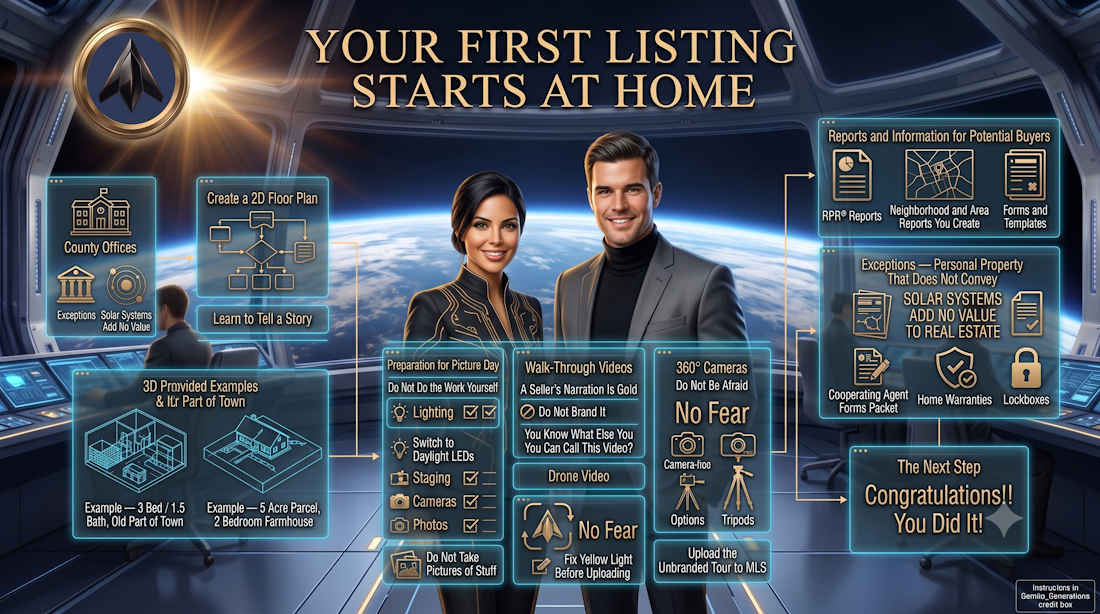
Your First Listing Starts at Home
Real World Experience Gets You Hitting the Ground Running
Hello! Welcome to the free lesson from the SREA Certification.
The two agents in the scene above are Elena Vega and Rick Hewitt. They represent SREA Certified Agents who follow the IIA example in their businesses, and they're here in cyberspace SREA Certification to introduce each lesson.
This is not the full lesson that you would receive inside the SREA Certification, and you won't have Cypher, our personal AI Assistant for Team Members, to answer questions, but if you are a brand new agent, it will give you real world experience, and your confidence will go through the roof.
This experience is the entire object of the SREA Certification. It is like that thought you have: "I wish I knew then what I know now."
This is your chance to collapse time, gain twenty years of experience, and integrate AI into your workflow, all in easy-to-follow, step-by-step instructions.
We are all so glad that you are here. We hope to see you on the inside as one of our Team Members soon.
Until then, enjoy the lesson!
Lesson Introduction
This real world exercise is one that will instill confidence in you listing a property. You will learn all of the steps to list a home, using your house, or the house of a friend. There are lots of pieces to put together a full picture of the property for sale. There are pictures and video and drone aerials, but there are also home warranties and utility accounts. Think of it as selling a property, but also as providing the new owner with everything that they will need to take over that property. You will learn to do this better than any agent out there, and make your listing shine!
County Offices
The first thing is to collect every public record on the property.
Go to your County Assessor and purchase a copy of the Property Record Card (PRC) they have on record. Mine charges $1.
- Study all the detail — when the buildings were built, what the materials are, lot size. There is a lot of information on a PRC, and agents either do not know they are available, or do not bother.
- Look on the property data for the Book and Page of where the Deed is recorded.
Go to the County Recorder office and purchase a copy of the Deed. Why? Because it can show you potential problems before you even write the listing contract.
- An ex-spouse still shows as an owner
- The property is on a contract for deed — you will also need the owner's signature to list
- The property is in a trust and needs to be written up that way with the Trustee signing
I make the copy of the deed part of the listing agreement. That way the full legal description and proof of ownership and the legal right to convey are always part of the listing.
- If the home is in a subdivision you will also need to get a copy of the subdivision covenants
- If there is a Home Owners Association® you will need to contact them for their rules and regulations
- If you are working with a property owner that lives outside of the area and you are doing everything by email, be sure and have your listing agreement notarized by the property owner. That way they have to prove who they are and that helps protect everyone who is a party to the transaction
Go to your County Collector office and get a copy of the property taxes for last year, or grab it off their website.
Go to your County GIS website and save a screenshot of the parcel.
- Find the School District Map and the Fire District Map
- Search your state for School District information by district. Here in Missouri you can print out an information sheet that has all the staff and teachers with their phone numbers
- If you are rural and have Volunteer Fire Departments, find out the Fire Chief's name and call him. Find out exactly what information they need for a new member, what the annual dues are, and the address to send everything to. The buyer will be delighted and they get a discount on their homeowners insurance
Create a 2D Floor Plan
Floor plans are the number one feature requested by buyers. Learn how to use CubiCasa — it is free — and create 2D floor plans for every listing, including any outbuildings.
Learn to Tell a Story
You will be explaining to your Sellers that your marketing remarks will actually tell a story. Every property has a story and people get vested in the story. You want your Sellers to understand that your marketing is next level — not just the number of bedrooms and baths and square footage.
Sell the benefits not the features. Facts Tell — Stories Sell. Learning how to tell a story is not that difficult, just a little research and practice.
Example — 3 Bed / 1.5 Bath, Old Part of Town
"They call this home, the Water Tower Homestead. It sits on a narrow tree lined street, in a quiet older established neighborhood, that is a mix of remodeled Farmhouses, midcentury brick Ranches and the new Contemporary Cottage Style Homes. It adjoins the parcel with the historic little Ava Water Tower and the tiny Civil War cemetery. The water tower is one of the first in Ava and its well still supplies water to this part of town. There are just a few Civil War headstones, one with a decorative little fence. So much packed into this property, with an Orchard of Fruit and Nut Trees, even two Pomegranates! Large Amended Garden with its own Garden Shed. The large yard has huge Shade Trees, with a gorgeous Magnolia tree and an old Dogwood that grace the front yard. Front walk is lined with red roses. Your own tire swing on the huge Shade Tree in the back yard, and there is a nice fenced in area for your pups. A completely refurbished Shop Building sets in the side yard with enough power outlets to satisfy the most avid do it yourselfer. All new wiring, interior and exterior lighting, insulation, windows and exterior paint. This four bedroom home features wood and tile floors, and oversized bedrooms. You will love the large open Living Room/Dining Area with its large Picture Windows. Lots of room to entertain family and friends. Enjoy outdoor entertaining on the large open Patio on the side of the house. The Patio accesses the fourth bedroom, which could also work for an office with its own entrance. On the corner of the house there is RV Power Hookup! The small basement is perfect for extra storage, while being a handy shelter for severe storms. Lots of updates have been completed. Be sure and see the Supplement Sheet for details. Come fall in love with this little homestead and our amazing community here in the heart of the Ozark Mountains. An hour to Springfield or Branson and less than that to the Lakes and Rivers to the South."
Example — 5 Acre Parcel, 2 Bedroom Farmhouse
"They call it Apple Tree Farm. Twenty two years ago Katy's dad carved off this five acres, and together they built this beautiful little farmhouse for her and her son. All the fruit trees that she planted are well known by all the local wildlife. The bluebirds build their nests in the Spring, the box turtles feast on the over ripe plums in the Summer, and the White Tail bring their fawns to eat apples in the Fall. It all adds to the magical feel of this beautiful little farm surrounded by large acreages, that sits in the quiet known as Apple Tree Hill. Katy's son has returned and put a fresh coat of paint on the interior, and now the farmhouse is ready for you to continue its story. Come fall in love."
Sometimes I go to Google Earth and bring up the topographical map, because it will have historic names of areas or old waterways. In parts of the country even the ridges and hollows have names if you go look at the old maps. It really gets the buyers' attention when you can say something like "Ten acre woods that sets just off of Barren Fork Ridge."
Or sometimes I refer back to the ancients that lived here before the white settlers came in. "Back home, in my small patch of woods, surrounded by Mark Twain National Forest, I sit beside my patio firepit, reminiscent of the campfires of the Osage, enjoy the night air, and listen to the tiny tree frogs sing their ancient song."
I give a name to every property, share a bit of history if I know it, or anything that makes it unique. People love stories, and the more vested they get in the story, the more interested they are in the property.
Preparation for Picture Day
The public does not understand "more pictures coming soon," "will be finished," or "working on repairs." They only see what you provide in pictures and video. You might as well be selling it as is, because that is all that they understand.
You want the property clean and as market ready as possible. Otherwise just save your breath and take your pictures and video.
Do Not Do the Work Yourself
It does not have to be professional staging. It can be picked up, cleaned up, beds made kind of stuff. My best advice is do not do the work yourself. I did that for years, and I guarantee you that caring more about the sale of the property than the owner does is not good for you. It does not make a difference with the price, and it could end up making you and your brokerage open to being sued. Just do not do it. Do not do it!
Once the property is as close to market ready as it can be, turn all the lights on, toilet lids down, and go through with your video camera, then your still photo camera, and then your 360 camera.
If you have the owner doing the video walk through with you that is great. It is one of the reasons I recommend doing the walk through video first. Once the owner is done they can leave or go about their day so you can get everything else done. The other reason is that you want to do the video when you are fresh.
You may be tempted to do each room all at once, but just think through all the different equipment and trying to hide what you do not need in the shot — like anything you try to multi-task, it does not go well.
Make a plan of where you are going to start and where you are going to finish and follow that with each camera. With a home in a subdivision, I start at the street and give them a view of the neighborhood, then scan across the house, then walk to the front door, through the front door, then follow the floor plan through the house clockwise, and then outside through the back door and around the house. Just exactly like you would if you were showing someone the house who was actually there. If the house has more than one story, be sure and get video and pictures of the connecting staircase and do each floor separately. That way when people are looking at the video or pictures online it is easy for them to follow which floor they are on and how the rooms connect.
Once you have finished around the house, if there are separate buildings do each of those.
Lighting
Switch to Daylight LEDs
Swap all bulbs to Daylight LEDs for a brighter appearance and cleaner photographs. Most people still use Warm White bulbs in their homes not realizing that they throw a dull yellow light across everything that shows up in pictures. That yellow light makes everything look old and dingy. The LED Daylight gives you a bright clean light that looks great in pictures. With the Warm White you will fight trying to remove the dingy yellow cast from your pictures.
[Link Placeholder — Paint.NET Lesson]
I take a package of LED Daylight bulbs with me to every first visit, especially listing presentations. Once you change out a couple of the Warm White bulbs and they see the difference they will want to change them all out. It is a huge improvement. Such an easy way to impress. No one else is doing it!
I also take a couple of small moving boxes and a small taper. That way they can pack little things right away that might be stolen. No one else is doing that either!
Staging
This can be as simple as cleaning up clutter and making sure the beds are made. But the better a home is cleaned and staged the higher the offers will be.
There is virtual staging — you can remove everything from a room or just clean it up. You can furnish an empty room. Just about anything you can imagine can be done with virtual staging. But you must clearly mark your picture as being a digital representation of a possible improvement.
Virtual staging tools are available at a variety of price points. Check with your broker about what your brokerage provides, and search for current options — there are good free and low-cost tools available today.
Cameras
We are going to cover everything that captures an image — your cell phone camera, a camera, a video camera, a 360 camera, and a drone camera.
Camera technology is so good, even in our smartphones, that you do not need to buy expensive equipment and try to learn how to use it. Use what you have to start. Buy better when you can afford it, or let everyone know what you want for your birthday!
The drawback to using your cell phone is that there is no flash. Using any camera set on HDR, Panoramic, or wide screen with the flash on will give you much better pictures. When there is glare coming through the windows, forcing your flash on will help overcome the glare.
Photos
Start at the top of the driveway. Take a straight on picture of the property, then look for an interesting angle that you can use for your front of the house picture. Take a picture of the front porch and the front door. Then into the room just inside the door. I try to take a picture from both ends of the room, or from corners if it is a very large room.
In pictures it is always hard for people to see how the rooms connect. Taking your pictures with all of the doors open and all of the lights on so they can see into the connecting rooms helps with that.
Move around the house in a clockwise path. Take pictures of bedrooms that show the closet position and be sure and get the windows in the frame. Take pictures of hallways and stairways — they are easy to overlook, but buyers want to see them and they help to understand how the rooms connect.
Outside, early morning is better than late in the day. Overcast works well for outdoor pictures, or noon when the sun is very high in the sky, because there are fewer shadows. But dreary grey skies are horrible for showing off the front of a home. On those days I will take all the indoor photos and come back when the sun is shining for the outdoor pictures. There are apps where you can swap out the sky, but they will also be flagged as AI generated or edited photos.
Pictures of the garage, then step outside and take pictures of the yard, the sides of the house, and any outbuildings. Anything that is different — fruit trees, tire swings, decorative plants. If it will help tell the story, add a picture.
Do Not Take Pictures of Stuff
I laugh out loud at what some agents take pictures of. You would think it was to sell everything the seller owns, not show the house. If there are family photos on the walls I would recommend taking them down and packing them up. You do not want to show them on the internet, and they are moving, so packing up is a good thing.
Search "How do I get the best picture out of my [make and model] cell phone?" There is so much information and so many choices available.
Walk-Through Videos
Who would the buyers love to hear from the most? The property owner. They know more about the property and you can get them to help you get their property sold. The property owner will have all kinds of little details that they want the buyers to know.
Ask the property owner if they would do a video with you. The first thing they are going to say is "I do not want to be on camera!" Tell them they do not have to be. Your buyers want to see the property, not people.
Work out a path that you are going to follow to shoot the video. Have the owner walk beside you just behind the camera. As you slowly walk through the property have the owner talk about what the buyer is seeing in the video. If the seller misses something, you just ask them a quick question to keep it moving. Buyers love it. Sellers really appreciate that you let them make sure that every potential buyer got all of the information. And no one else is doing that!
A Seller’s Narration Is Gold
Their insights about property improvements and other details can be a unique selling point. I have had the seller do this for me when previewing a property for one of my buyers on another agent's listing, with their permission.
- Engage the seller — have them teach you about selling their property
- Keep it conversational — natural discussions are more engaging and authentic
- If they forget something, ask them a question to bring their attention to it and let them continue
- Make comments like "That is beautiful" and "What a great feature" — things you want that potential buyer to hear
Before I bring out all my cameras to start taking pictures, I do a walk through with my little palm camcorder. It picks up voices perfectly, and because it is so small it is not at all intimidating. It is my secret weapon!
Do Not Brand It
The stats show that more than 70% of all properties sold are by cooperating brokers. You can start the video with the full address — Street Address, City and State. When someone is watching it on YouTube they will appreciate knowing where the property is located. I provide all of the media I create to sell the property for my fellow agents to send to their potential buyers. No one is doing that. While other agents are showing off all their branding, you can explain to your Seller how you are working to get their property sold by not branding.
Be sure and work out the path you are going to take ahead of time.
- Move slowly — agents tend to move too fast, especially when changing direction. Motion sickness is a real thing.
- When you enter a room, slowly scan from left to right, pause, then move forward
- When you enter a bedroom, scan, pause, then back out of the room so the camera catches that doorway again, then change direction and move forward. This makes it easy for those watching to keep the orientation of the rooms straight
- Turn off your camera going up or down the stairs, then start again from the stairs — too much bobbing
- When shooting outside, start at the top of the driveway, walk toward the house until you can see the front door, then walk all the way around the house until you get to the front door again
You can upload your video to your YouTube channel and then use that link everywhere else you want to show it. Record your video in MP4, usually around 30 frames per second. This will keep your file sizes manageable and easy to upload.
You can take it into Descript — descript.com — and edit it into clips that you can use on Instagram. In Descript you can edit the video by editing the transcription, eliminate filler words, and it removes them from the video. YouTube — youtube.com/@Descript
You Know What Else You Can Call This Video?
An Online Open House. This video, coupled with your 3D Property Presentation, means buyers will see more and know more about the property than anyone who came to an open house and just walked through. Look at you being all techy!
Drone Video
They are fun to fly, they give a perspective that people love to watch, and they crush your competition. Get a drone!
Real estate agents flying drones for business must possess an FAA Part 107 Remote Pilot Certificate, register their drone, and follow strict safety rules.
Key FAA Part 107 Rules for Agents
- License Requirement — You must have a Remote Pilot Certificate to use drones for marketing. This is considered commercial use regardless of the drone's weight.
- Registration — All drones used for business must be registered with the FAA at FAA DroneZone — faadronezone.faa.gov
- Altitude and Speed — Keep drones below 400 feet and under 100 mph
- Line of Sight — You must see the drone with your own eyes at all times, without binoculars
- Airspace Restriction — Do not fly in restricted airspace such as near airports or national parks without prior LAANC authorization
- Remote ID — All drones that require FAA registration must broadcast Remote ID information. Confirm your drone is compliant before you take off — faa.gov/uas/getting_started/remote_id
Safety and Privacy Best Practices
- Obtain written consent from the property owner before flying
- Avoid flying over neighboring properties or capturing neighbors' faces or vehicles in photo or video
- Do not fly directly over people or moving vehicles
- Fly only in good weather conditions
Operating without a license can lead to fines with personal liability up to $11,000 or more per occurrence.
For maximum safety and legal compliance, many agents hire licensed, insured drone professionals rather than flying drones themselves.
Alex Harris — youtube.com/@QuickAssTutorials
360° Cameras Do Not Be Afraid
Once you understand just how simple these cameras are to use, you are going to think child's play. The thing that makes the 360 cameras different is the fisheye lens. That is it.
The picture that the fisheye lens takes, once processed, gives an experience like standing where the camera was. If you were outside you can look up into the sky and down at the grass under your feet. Turn in a circle and you are looking at everything the camera sees. It feels just like being there. Mine also captures sound so it really is like being there.
You take the 360 camera, screw it on top of a tripod, make sure the lens is at your eye level. Make sure the camera is level — there is a level on the tripod — and hit the power button, the wifi button, and either the picture or video button.
The control for the camera is an app on your phone. You turn on the Bluetooth on your phone, start the app and you are seeing what the camera sees. But it is a fisheye lens so it looks really weird. Now hide! Unless you want the camera to take a picture of you standing in the room staring at your phone. Hit the button and take the picture. My Ricoh makes a high pitched bird tweet to tell me it took the picture. Give it a few seconds to process. That is it.
I start outside at the front door. Then I step through the door and take the next picture with the camera in the center of that room. If it is an open floor plan, I take three — one in the center, one at one end, one at the other end. Think thirds, and put the camera in the center of that section of the room. You do not want them turning the 360 scene and coming up right next to a wall.
Move around the house in a clockwise path making sure to also take pictures inside large walk-in closets, hallways, and stairways. The techs at EyeSpy360 need to know how the pictures connect. The folks looking at your 3D Presentation will be traveling those connecting hallways, staircases, and peeking into those closets.
When I finish the house I am at the back door. I walk around to the top of the driveway and take a picture there, then move halfway to the house in the center of the front yard and take another, walk around to the side of the house, the back of the house, the opposite side of the house.
You can also take pictures of the inside of any outbuildings if you would like to add those to your 3D Property Presentation.
Fix Yellow Light Before Uploading
If you took pictures inside a home with Warm White bulbs, every picture is going to have that dingy yellow light. You can upload your 360 pictures into Paint.NET to correct it. Go to Adjustments, then Auto-level.
Paint.NET is free app from Microsoft Download it here.
All of your pictures are on your phone. You use the EyeSpy360® app to connect to your account and upload all the pictures. Once all of the pictures are uploaded the EyeSpy360® program will give you a total for processing the tour. Within a day you will get an email that your complete 3D Tours are ready and you can go download them.
Upload the Unbranded Tour to MLS
I say "them" because you have both branded and unbranded tours. Upload the unbranded tour to your MLS so that it is shown along with all of your pictures to every potential buyer. All of your MLS member agents will also have access to the listing to send to their potential buyers, and the unbranded 3D Tour will play. Upload just your branded 3D Tour and only you will see it. What a waste.
Most people do not understand the concept of 360 pictures. I explain that inside they will be able to look up and see the ceiling, look down and see the floor — the entire room as if they are standing there turning in a circle. Same for outside — they can look up and see the sky, look down and see the grass under their feet.
Floor plans are the number one feature requested by buyers. With 360 degree property presentation tours, 2D floor plans are generated with room measurements. Always use a Measurements Disclaimer to address potential inaccuracies.
360° Camera Options
The cameras range in price but all produce good quality. Record and deliver in 4K — buyers are viewing your tours on 65 inch 4K Crystal Screen televisions and your content needs to meet them there.
- Ricoh Theta — A reliable, easy to use entry point camera available for around $300. You will still need a tripod.
- Matterport Starter Kit — Matterport is now offering 360 tours they call digital twins, that can generate 4K print quality photos, schematic floor plans, and guided tours. They offer a starter plan that includes the gear to use your smartphone with a tripod for less than $150. The camera on your phone can take better pictures than you think.
[Link Placeholder — Matterport Starter Kit]
EyeSpy360® — eyespy360.com — $18.00 per tour. A clean professional interface where buyers can click through the home as if they are walking through it in person. EXP agents can access full service for $14.95 per month plus $15.00 per 3D Home Tour. YouTube — Search EyeSpy360 on YouTube for tutorials.
Tripods
You need a tripod with enough height to get your 360 camera to eye level. A level on the camera platform is helpful so that if you are on a hillside or stairs you know the camera is level.
Tripod Safety — Please learn to be extremely careful when opening and closing the latches to lengthen the legs on the tripod. Some of the worst cuts I have gotten on my fingers were when I forgot. They do not just pinch, they cut.
I just bought a Tripod Dolly and I love it. Now I put my little video camera on the tripod and run it around on wheels. It gives a smooth video all at the same level and feels like a mini drone took the footage. So fun!
Reports and Information for Potential Buyers
RPR® Reports
Prepare both a Residential Neighborhood Report and an RPR® Area Report to provide buyers with a complete understanding of the area.
Exercise — Go to RPR® and put in your home address and see everything that is known about your property. If you need to sign up for RPR® first, you do that on their website — you will need the membership number that NAR® gave you when you first joined. RPR® is a free benefit of NAR® membership.
RPR® — narrpr.com
Neighborhood and Area Reports You Create
Neighborhood reports can be as simple as using a picture of the house and making a list of everything that someone moving into the area would find helpful — neighborhood schools, pharmacy, gym, utilities, cell phone service, and more. Make it as long and detailed as you like. Once you create a Neighborhood Report for a certain area you can use it any time you list in that area.
What the Neighbors Are Saying — When you go out to introduce yourself to the neighbors, before you leave ask them what they like about the neighborhood. You can use all of those quotes as part of marketing the property to help get it sold.
Forms and Templates
- Always use your state specific listing forms
- Familiarize yourself with common forms and comprehend their implications
- Know the relationship between forms and recognize when supplementary forms are needed
Disclosures — You Cannot Help Them — Have your sellers fill out all of the disclosures as completely as they can. Do not put pen to paper on any disclosure. If they need help find someone else. It cannot be you.
Time Saving Tip — Using Templates — I always opt for a once and done approach. For any forms that require accompanying documents, I merge the blank forms together and keep them as a template.
Example: Pair the Lead Based Paint Disclosure with the Lead In Your Home Brochure. There is a new Lead In Your Home Brochure download it here. EPA will upload a revised 2026 version of Protect Your Family in Arabic, Chinese Simplified and Traditional, French, Korean, Polish Russian, Somali, Tagalog and Vietnamese as soon as they are available.
All your forms that have information like license numbers and brokerage details — fill out once and save as templates for easy reuse.
Exceptions — Personal Property That Does Not Convey
When you list the property your seller may have fixtures or personal property that they want to take with them. It is critical that you make your seller's intentions known to everyone looking at your listing.
If there is a fixture that your Sellers have decided they want to take with them — like a special light fixture or a wood stove — it would be best if they went ahead and changed it out for something they could leave. If they do not want to do that, be sure and put whatever it is on an exception list and also make sure that it is well marked with a sign or poster that makes it clear that it is not going to convey. It is human nature that if you tell someone that something is not going to convey it can easily become a sticking point in the negotiation, which is why I recommend that the sellers just go ahead and change it out.
Things that need to be clearly addressed:
- Outside storage buildings — the smaller ones are made to be picked up and moved
- A harvest — a garden or a hayfield. Make sure that the seller makes their intention known. I have had entire hay crops harvested a day before closing, and another one where the seller harvested all the hay and gave it away
- Firewood — easily assumed to be conveying, and then the seller gives it away or sells it all just before closing
- Propane tanks and the propane in the tank — both need to be addressed in the listing and in any offer
- Livestock gates, portable corrals, hay in the barn
- Trees — even trees need to be listed as conveying or part of a harvest. I have listed property as mature woods and then had the seller hire someone to harvest all of the trees without telling me. I have sold property where the seller had an entire section clear cut before closing when my buyers thought they were purchasing a wooded property
Appliances Must Be What Buyers Saw — I have had sellers decide to give the really nice stove to one of their children and switch it out with an older one just before closing. You and the seller have to understand that if appliances are going to convey, they have to be the appliances that the buyers saw in the pictures and during their visit to the house.
Blanket Statement for Every Seller — When you list a property make a blanket statement to your sellers: "What on this property are you going to sell, or take with you, that is not going to convey to the new owner? That includes the landscaping and fencing."
When Writing an Offer — The first thing you do is go to the MLS and include everything that is listed there. If the sellers are leaving the Washer and Dryer and the Refrigerator, and you do not write them in your offer, you are telling the sellers that your clients do not want them. It would not be the Sellers' fault if they sold off the appliances before closing — the error would be yours. I usually need extra space to make sure that everything that my clients saw when they visited the property conveys to them, even using the term "as seen on this date."
Solar Systems Add No Value to Real Estate
A solar system adds no value to the resale of a home. When the home is appraised the solar system will not be on the appraisal. If the solar system was purchased with a loan any balance will be paid in full at closing.
Homeowners may not be aware of this situation when they decide to sell their home. It is a difficult conversation to have if it is news to them.
Because it adds no value to the resale of the home, you can add the solar system value to the sale price. You sell real estate. The solar system is not real estate.
Cooperating Agent Forms Packet
A Cooperating Agent Forms Packet may sound very strange to you. But I can tell you they are greatly appreciated. If you have ever been that agent trying to get an offer together under a time deadline you know what that level of stress feels like. By creating the paperwork so that all the cooperating agent has to do is upload it to their software to fill out signatures and other needed information, you assure that the forms will all be there and filled out correctly.
Add this to your Listing Presentation so that the Seller knows how diligent you are in making sure that everything is correct.
How to Prepare the Packet — Fill out the Sales Contract with all the Sellers' names, or Trust or legal entity, and all of your information. If you need to add parcel numbers or any other property detail to assure contract correctness then add that as well. Do not sign it. To sign it ahead of time would appear that it had already been submitted to you. Do not add any of the personal property that is to convey — that part is still the responsibility of the selling agent. Do add the Exceptions List if you have one. Once you have filled out the sales contract, merge everything into one document titled Selling Agent Packet. Put it in the same order that you would submit an offer to a seller:
- Sales Contract
- Disclosures
- All Seller's Disclosures including the Lead Based Paint Disclosure and Lead Based Paint Brochure if required
- Any other forms that require both the Seller's and Buyer's signatures
Home Warranties
Home warranties are a great way to make the potential buyer comfortable with the purchase of an older home. Check with the sellers about appliances that are staying — if new they may still be under the manufacturer's warranty.
A home warranty is a service contract that covers the cost of repairing or replacing major systems and appliances in your home. Home warranties typically last for 12 months and are often recommended when purchasing an older home. Home warranties cover general wear and tear, while homeowners insurance protects your home from covered perils.
[Link Placeholder — Home Warranty Lesson]
Lockboxes
Check with your MLS — some require that you use a specific type of lockbox. If they sell those lockboxes you can ask if they have any used ones for sale. There are agents that have left real estate or just have more than they can use who will leave their lockboxes with the local board of REALTOR®s to sell for them.
I always used a simple combination lockbox to hold the house key. When I was required to use a specific type of lockbox in certain counties, I always also used a simple combination lockbox that could be used by agents that were not members of the board that required the electronic boxes. That assured that my listing would always be shown. Also handy for repair people and appraisers that needed access to the property.
Solar Powered Sign Lights — Not many real estate signs can be seen at night. This is an easy way to impress your seller and the neighbors will notice too. An idea to make your sign stand out and offer something that no one else is doing.
The Next Step
The next step after getting all of your documents, pictures, video, and link to your 3D Tour together would be to post it all to your MLS, or create a simple webpage, or both, to begin your showings and get ready to do an Open House.
If you are a member of an MLS you can post everything as if you were going to publish a new listing without actually publishing it. I recommend that you finish this lesson with that.
The reason that posting to the MLS is not included here is because AI searches have changed the way that search engines find properties for sale and bring them into search results. How to prepare all of your documents, pictures, and video so they can be found by the new AI Zero Click Searches is a separate lesson.
Congratulations!! You Did It
You have learned a lot in this real world exercise. Your confidence is through the roof, just like I promised. I am proud that you took it to heart and finished. I have no doubt that you are ready to learn more, and Cypher™ is waiting to meet you!
We look forward to having you become our newest Team Member and adding your name to the Certified Stealth Real Estate Agents Directory.
Sheila